Only Z9X now
I don’t have a Z9X, this guide is experience when help others unbrick their Z9X
Any question, please issue on github
Term explanation
| Term | Explanation |
|---|---|
| Target | The device that needs to be flashed, here is your box |
| Host | The device performing the interaction, which is the PC you are using |
Unbrick with TTL/UART
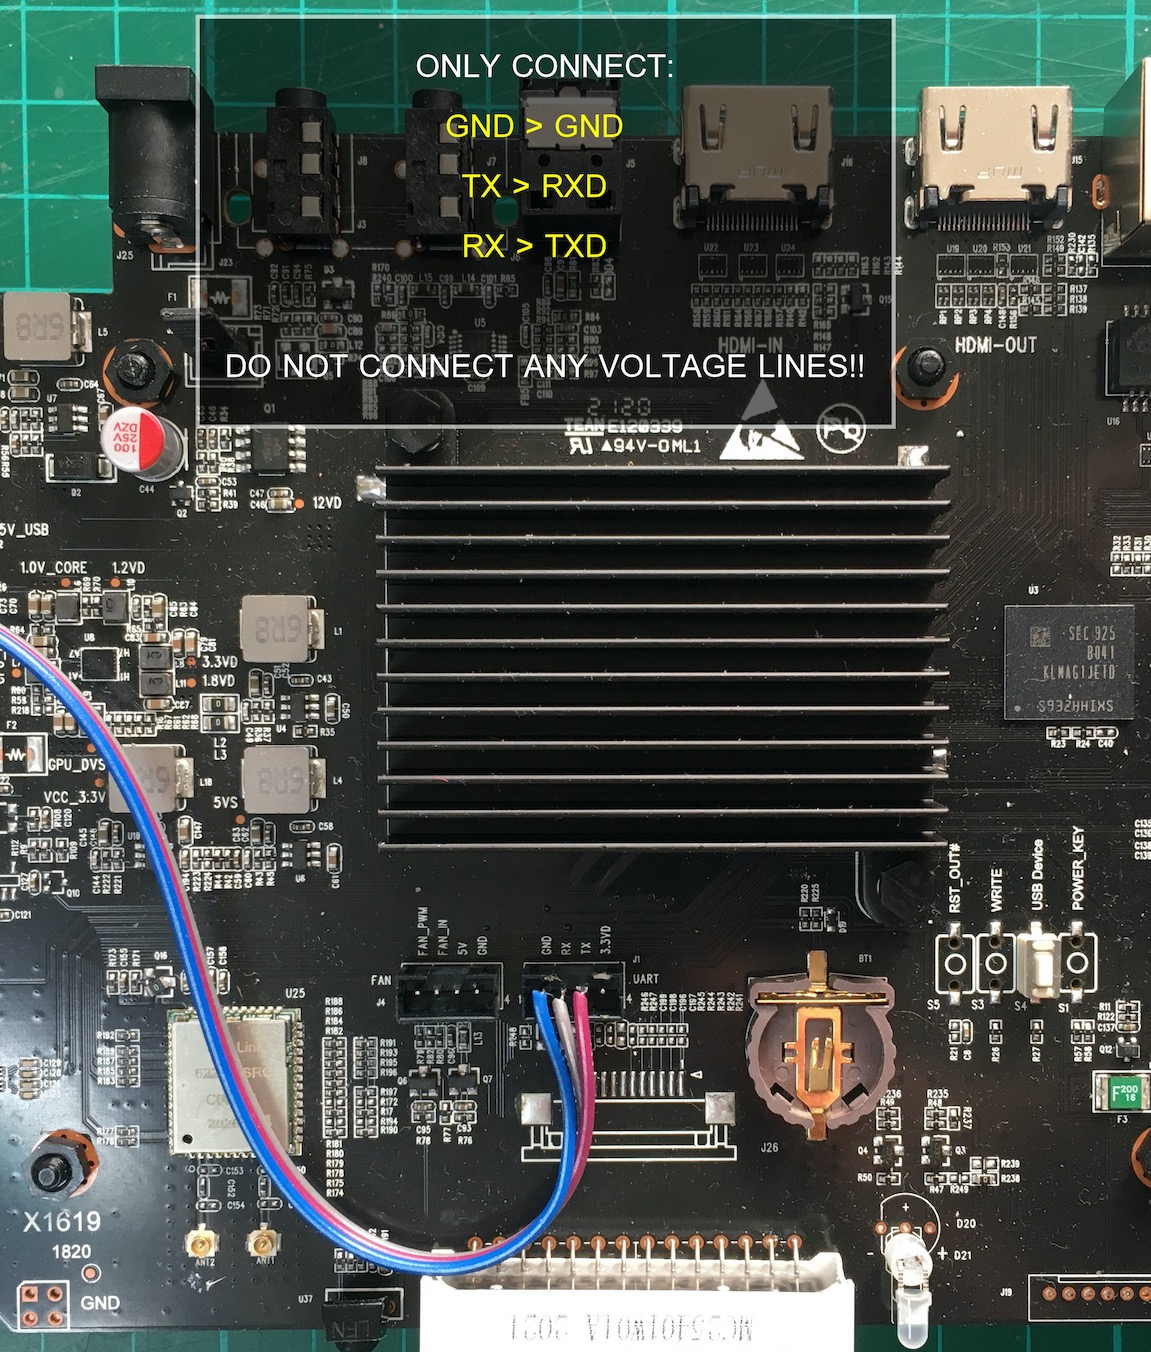
First of all, we should be able to connect to the UART.
Here is the photo provided by forum user Markswift2003:
Restore FWTABLE Signature
If you get stuck when flash before, it is likely that the signature of fwtable (similar to the partition table) is destroyed, and the machine can no longer be flashed. In this case, just restore the fwtable signature.
-
Shutdown the target device
-
Connect UART, then hold the ESC key in the terminal and turn the target device on, until the terminal displays
*** ESC Pressed ***(may not be the last line) or when the terminal is no longer scrolling, then release the ESC key. At this time, press the Enter key several times it should displaysRealtek> -
Execution
helpin terminal, will display all supported commands, confirm whether they are includedrtkemmc,dwandmw, if not, do not continue -
Execution
rtkemmc read 0x03000000 20744 512in terminal, it will load the header of fwtable to memory -
Execution
dw 0x03000000 8. If it says43534552 5f5f4555, goto next step; If it says4f524556 5f5f414e, it means that the signature of fwtable is ok, we don’t need to touch it, we should try Unbrick with UART + U Disk, do not continue next step; If not either of both, I don’t know what’s going on, do not continue -
Execution
mw 0x03000000 0x4f524556 -
Execution
mw 0x03000004 0x5f5f414e -
Execution
dw 0x03000000 8. It should displays4f524556 5f5f414e -
Execution
rtkemmc write 0x03000000 20744 512, it will write back the header to fwtable -
Shutdown
Signature of fwtable was restored, now we can follow the official guide to flash the target device. If it still fail in flashing, then try the Unbrick with UART + U Disk
Unbrick with UART + U Disk
Usually you can use this method to restore the firmware, unless uBoot is broken.
Prepare a U disk with 2GB or more space, if it is not in FAT32 format, format it as FAT32.
If you can get to this point, you must have tried the official flash tutorial (Z9X ), I believe you already have install.img。
Copy the install.img to the root directory of the U disk.
Download z9x_flash_rescue.zip, then unzip it to the root directory of the U disk.
We should have at least these files in the root directory of the U disk:
- z9x_flash_rescue.bin
- install.img
The U disk is ready.
Flash process:
-
Shutdown the target device and plug in the U disk
-
Connect UART, then hold the ESC key in the terminal and turn the target device on, until the terminal displays
*** ESC Pressed ***(may not be the last line) or when the terminal is no longer scrolling, then release the ESC key. At this time, press the Enter key several times it should displaysRealtek>, it means that you have entered the uBoot console -
Execute
helpin terminal, will display all supported commands, confirm whether they are includedusb,fatloadandboot, if not, do not continue, try other solutions -
Execute
usb start, this step enables USB and scans the USB devices, it will take a few seconds, and it will displayRealtek>on finished. Check if there is anyStorage Device(s)found in the output. If not, change the USB slot and perform this step again -
Execute
fatload usb 0:1 0x20000000 z9x_flash_rescue.bin, If there was any error, change0:1to0:20:3or0:4and try again, depending on the partition of the U disk -
Execute
rtkemmc write 0x20000000 20744 172032000, it will take a few moment to write emmc -
Execute
rtkemmc erase 7704968 7737736, it will erase boot logo, avoiding checksum verifing fail -
Execute
boot r, the flashing will start soon without superise
Unbrick with UART + TFTP + U Disk
Usually you can use this method to restore the firmware, unless uBoot is broken.
Please try the “Unbrick with UART + U Disk” solution first, if it not works, then try this.
This solution requires:
- U Disk
- Network cable (for the target machine to access TFTP)
If uBoot does not support usb or fatload commands in the “Unbrick with UART + U Disk” solution, but supports the net command, and tftp appears when the net command is executed, then tftp can be used to load the flashing environment.
Prepare a U disk with 2GB or more space, if it is not in FAT32 format, format it as FAT32.
Copy the install.img mentioned above to the root directory of the U disk so that the U disk is ready.
Prepare a TFTP server, or deploy TFTP service on the Host, Windows users refer to this, Mac users refer to this.
Download z9x_flash_rescue.zip, then unzip it to the TFTP root directory. So we have z9x_flash_rescue.bin in TFTP root directory.
In this way, the TFTP service is also ready.
Flash process:
-
Shutdown the target device and plug in the U disk
-
Connect UART, then hold the ESC key in the terminal and turn the target device on, until the terminal displays
*** ESC Pressed ***(may not be the last line) or when the terminal is no longer scrolling, then release the ESC key. At this time, press the Enter key several times it should displaysRealtek>, it means that you have entered the uBoot console -
Execute
helpin terminal, will display all supported commands, confirm whether they are includednetandboot, if not, read the PS below -
Configure the target network. First try DHCP automatic configuration, by execute
net dhcp_client, it should outputDHCP client start,wait a few seconds, if there is outputnetif en ip ..., then go to the next step; if there is no output, then manually configure the network, executenet ifconfig <IP address> <mask> 0.0.0.0, pay attention to replace<IP address>and<mask>with appropriate values (if the TFTP server is in the internal network, it only needs to be in the same subnet as the TFTP server) (if Your TFTP service is on the external network, you need to replace0.0.0.0with the real gateway address, usually the router IP) -
Execute
net ping <TFTP server IP>(replacing<TFTP server IP>with the IP of the TFTP server). If the network configuration is ok, it will output multipleping: send ...andping: recv .... When it is no longer outputting, press Enter to return to the console. If there is no output ofping: recv ..., there should be a problem with the network configuration, please solve it yourself. -
Execute
env set tftpblocksize 1468; net tftp 0x20000000 <TFTP server IP> z9x_flash_rescue.bin(replace<TFTP server IP>with the IP of the TFTP server). If there is a stuck, it may be that there is a problem with the TFTP service, or the firewall has blocked the TFTP communication. After troubleshooting these problems, you need to restart from the step 1. -
Execute
rtkemmc write 0x20000000 20744 172032000, it will take a few moment to write emmc -
Execute
rtkemmc erase 7704968 7737736, it will erase boot logo, avoiding fail on checksum verifing -
Execute
boot r, the flashing will start soon without superise
PS: If there is not net command in uBoot, but tftp exists, replace step 3 to 6 by execute:
   env set ipaddr <IP address>
   env set serverip <TFTP server IP>
   env set tftpblocksize 1468
   tftp 0x20000000 z9x_flash_rescue.bin
PPS: If there is not boot command in uBoot, try go instead